Getting started transmitter TV Connector
Connecting the transmitter to a USB power supply
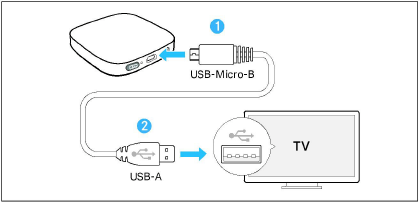
1.Connect the USB-micro-B plug of the supplied USB power cable to the USB-micro-B port of the transmitter.
2.Connect the USB-A plug to the USB-A port of your TV. For older TV models without built-in USB port, connect the USB plug to an external USB power adapter and connect to the power source (not included, optional accessory).
The transmitter automatically switches on (> Switching ON audio transmission).
Connecting the transmitter to an audio source
The transmitter can be connected to any audio source such as a TV, PC or stereo system. It supports two different audio cable inputs: optical (TOSLINK) or analog. Either of these audio cables must be plugged into the dedicated audio port on the transmitter.
Select the audio cable that is compatible with your audio source. Best audio transmission is ensured with the digital optical audio connection.

|
|
Ensure the chosen audio cable is firmly inserted into both the transmitter and the audio source. |

Connecting the transmitter with the optical cable
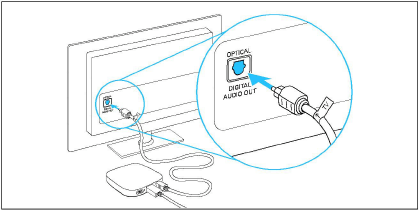
▷Insert the slim end of the optical cable into the transmitter and connect the wider end of the optical cable into the OPTICAL DIGITAL AUDIO OUTPUT of your TV (or audio source).
Connecting the transmitter with the analog cable
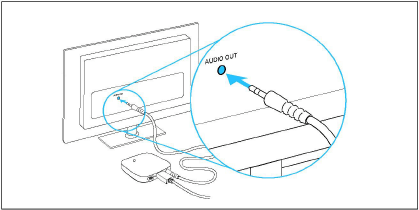
▷Connect one end of the analog 3.5 mm audio cable into the transmitter and the other end into the AUDIO OUT port of your TV (or audio source).
|
|
If your TV loudspeakers switch off when connected with the analog 3.5 mm audio cable, use the optical audio cable instead or check the menu of your TV to turn on the TV loudspeakers again. |
Connecting the TV Clear earbuds with the transmitter
▷Follow the steps in the chapter Connecting your earbuds to the transmitter „TV Connector“ (> Connecting your earbuds to the transmitter „TV Connector“).