Daily use
Daily use – TVS 200 Earbuds
Reconnecting for daily use
|
|
Pairing as described in (> Setting the earbuds to pairing mode) is only required when the earbuds are connected for the first time. They do not have to be paired again. |

1.Make sure that Bluetooth is activated on your smartphone – or that the TV transmitter is switched on – before you take the earbuds out of the charging case.
2.When you take the earbuds out of the charging case, they are usually automatically connected to the smartphone within 12 seconds.
3.This is displayed on the smartphone status screen or in the Bluetooth menu (the exact details may depend on your smartphone model).
|
|
•If you have activated Bluetooth after you have already taken the earbuds out of the charging case, or if you are out of range of your smartphone, you can briefly press the button on the earbud to re-establish the connection. •When the earbuds are paired with multiple devices, the earbuds first try to connect to the last connected device. If the device is not found, the earbuds will try to connect to the second to last connected device and so on. Since each connection attempt can take up to 7 seconds, the connection attempt in case of 6 paired devices can take up to 42 seconds. •Depending on your smartphone, it could be necessary to establish the connection between the smartphone and the earbuds manually. To do so, you have to either select “Sennheiser TVS 200” from the list of paired Bluetooth devices or briefly press the multifunction button on the earbud. •You can also stream from your smartphone if only one earbud has been taken out of the charging case. The first earbud taken out of the charging case is the primary earbud. This is important because the primary earbud will pick up your voice during a call. •When you reinsert the primary earbud into the charging case, the earbuds switch roles and the other earbud becomes the primary earbud. This briefly interrupts your streaming for about 5 seconds, as the remaining earbud has to be reconnected to the smartphone. |
Controlling the earbuds
The earbuds offer two ways to control the various functions.
|
|
The controls are only active when the earbuds are properly inserted into the ears. |
•Button control
Each earbud has a proper button with click feeling in the center of the button surface.
The button of the right earbud “increases (up)” and the button of the left earbud “reduces (down)”. Die Funktionen der Tasten können mit der App deaktiviert werden.

•Configurable double-tap control
To activate additional functions, tap the earbud frame twice lightly but clearly. The double-tap control can be configured via the app.
The default configuration of the right earbud is Ambient Awareness Off/On and the left earbud is Pause/Restart of playback.

Adjusting the speech clarity
During streaming or a call, you can select one of five predefined settings for speech clarity.
Setting 1: no additional amplification
Settings 2 – 5: boost of high frequencies for more speech clarity
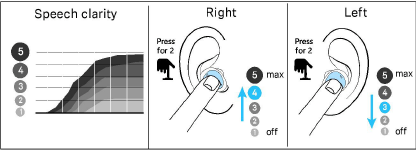
▷Long-press to the right (> 1.5 seconds) to increase the speech clarity.
▷Long-press to the left (> 1.5 seconds) to reduce the sharpness.
A voice prompt confirms the changes to the settings, e.g. “Program 4”.
Adjusting the volume
|
|
Warning Danger of hearing damage due to high volume levels! Listening at high volume levels can lead to permanent hearing defects. ▷Before putting the headphones on and before toggling between audio sources, adjust the volume to a low level. ▷Do not continuously expose yourself to high volume levels. |

During streaming or a call, you can change the volume.
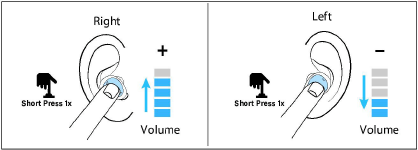
▷Short-press to the right (< 0.5 seconds) to increase the volume.
▷Short-press to the left (< 0.5 to the) to reduce the volume.
A short acoustic signal confirms each change of the volume. When you adjust to the maximum or minimum value, the voice prompt “maximum” or “minimum” can be heard.
|
|
Alternatively, you can also change the volume via the smartphone. |
|
|
Some smartphones prevent you from adjusting a high volume level when listening to music. If necessary, you must first allow high volume levels in the menu of your smartphone. |
|
|
The volume and speech clarity settings are automatically stored when the earbuds are switched off. |
“Ambient Awareness”
An important feature of the earbuds is the possibility to hear ambient sounds while streaming.
By default, the ambient sound level switches between level 0 (OFF) and 6.
▷Double tap the right earbud to switch ambient sounds off or on.

You can configure the ambient sound level via the app.
|
|
During a call, the ambient sound level cannot be changed, but a double tap will mute or unmute the earbud microphone. |
Making a call
To make hands-free calls, make sure that the earbuds are connected to the smartphone and properly inserted into the ears (> Connecting the earbuds to your smartphone (or tablet) and Inserting the earbuds into the ears ).
During a call, the previously selected ambient level remains active (> “Ambient Awareness”).
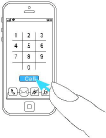
To initiate a call, initiate the call from the smartphone.
When you receive a call, you hear the ringtone in your earbuds. Use one of the two earbuds to accept or reject the call.
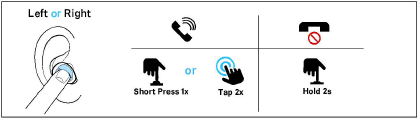
Accepting a call:
▷Double-tap or short-press
Rejecting a call:
▷Long-press (> 1.5 sec.)
Microphone pick-up
During a call, your voice is picked up by the microphones of the primary earbud.

|
|
It is important to protect the two small microphone inputs from dirt and foreign objects. |
The primary earbud is the one that is taken out of the charging case first.

When you reinsert the primary earbud into the charging case, the earbuds switch roles and the other earbud becomes the primary earbud.
|
|
Switching between the primary earbuds can take up to 5 seconds, and you may experience an interruption. This is normal. To identify the primary earbud in the app, a microphone icon appears below the R or L identification of the earbud. |
Call functions
Normally, the call is controlled using the smartphone. However, some important functions can be activated with a double-tap, such as muting the microphone or ending the call.

To activate these functions, download the “Sennheiser TV Clear” app from the App Store and follow the instructions (> Using the app).
|
|
Calls via Bluetooth always have priority over streaming. If, for example, you are streaming from your TV using the TV transmitter, you hear the ringtone in your earbuds and can answer the call. |
Pausing and resuming streaming
You can control streaming directly via the earbud.
▷Double tap the left earbud to pause or resume streaming.
|
|
•First, you have to start music playback from your device. •The configurations of the double-tap function can be changed with the app. •If you pause streaming during a call, the call is transferred to your smartphone. Use the smartphone menu to continue streaming audio through the earbuds. |
Using the app
We recommend using the app as it offers many advantages, such as:
•The earbuds are kept up to date with the latest firmware.
•The possibility to change and configure the preset English voice prompts.
•The possibility die Funktionen der Tasten auszuschalten,to configure the double-tap control for additional functions, such as starting the voice assistant, pausing and resuming streaming, playing the previous and next track, getting information on the battery charge status, controlling the ambient sounds, and more.
Download the app from the Apple App Store or Google Play and install it on your smartphone:
•Google Play Store: click
•Apple App Store: click

|
|
During a call (via smartphone, Skype, Microsoft Teams, etc.), the app cannot connect to the earbuds. |
Charging the rechargeable batteries of the earbuds
The charging case features a rechargeable battery.
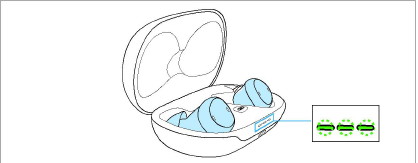
•Insert the earbuds into the charging case to charge them.
•The light indicator flashes to indicate that the earbuds have been inserted correctly and the charging process has started.
•The Bluetooth connection is interrupted when the earbuds are inserted into the charging case.
|
|
We recommend that you safely store the earbuds in the charging case when not in use. Whenever you store the earbuds in the charging case for an extended period of time, you should close the lid of the charging case. If the lid remains open, the earbuds will not switch off after charging and will discharge the rechargeable battery. |
|
|
Make sure that the charging contacts are free of dirt and debris. |
Charging the rechargeable battery of the charging case
The rechargeable battery of the charging station charges the earbuds up to 1.5 times before it has to be recharged.
Using the USB-C cable:
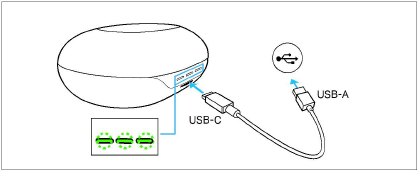
▷Make sure that the charging socket is free from moisture and contamination. Connect the USB-C cable to the charging case.
▷Connect the other end of the cable to a certified USB-A compatible power source (to be ordered separately, optional accessory).
▷The light indicator on the charging case flashes to indicate that charging has begun.
Qi wireless charging:

▷Place the charging case on a Qi-certified charging station (to be ordered separately, optional accessory).
▷The light indicator on the charging case flashes to indicate that the charging case is placed correctly.
|
|
Wireless charging via a Qi charging station can take longer than direct charging via a USB-C cable. |
Battery status indicators
Once the earbuds are in the charging case, their battery status is indicated.

|
|
Charging case |
|---|---|
|
|
Right earbud |
|
|
Left earbud |


The light indicators respond when:
•the earbuds are inserted into the charging case,
•the lid of the charging case is opened or closed,
•the power supply cable is connected to a power source,
•the charging case is placed on a Qi wireless charging station.
|
Light indicator |
Meaning |
|
|
|
lights up green permanently |
Rechargeable battery is fully charged |
|
|
flashes green |
Rechargeable battery is being charged, |
|
|
lights up orange |
Battery charge status 20 – 50 % |
|
|
flashes red |
Battery charge status < 20 %, |
|
– |
off |
Rechargeable batteries are exhausted, charging required |
|
|
flashes blue |
Manual pairing in progress |
|
|
flashes orange |
Firmware is being updated |


|
|
The light indicators light up or flash continuously as long as the charging case is open and supplied with power. The light indicators dim after 10 seconds when the charging case is not connected to the power supply or when the lid of the charging case is closed. |
|
|
Voice prompts provide information on the remaining battery charge status when the earbuds are worn. |
|
|
The battery charge status is also displayed in the app. |
Cleaning the earbuds
|
CAUTION Liquids can damage the electronics of the product! Liquids entering the housing of the product can cause a short-circuit and damage the electronics. ▷Keep all liquids far away from the product. ▷Do not use any solvents or cleansing agents. |
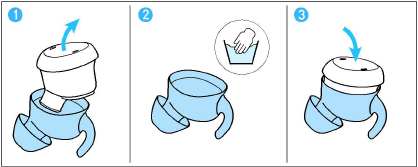
Over time, earwax may accumulate in the silicone ear adapter of the earbud. To clean the earbuds, proceed as follows:
1.Carefully remove the earbud from the ear adapter.
2.Wash the ear adapter by hand in warm water using a small amount of soap. Make sure the earbud itself never gets wet!
3.Make sure that the ear adapter is completely dry! Then carefully reinsert the earbud into the ear adapter.
To clean the charging socket:
▷Blow vigorously over the charging socket.
▷If necessary, carefully remove any stuck dirt from the charging socket using a dry, soft brush or a dry interdental brush. Only apply gentle pressure when doing so.
Information on the built-in rechargeable battery
Sonova Consumer Hearing GmbH ensures and guarantees that the rechargeable batteries perform at their optimum upon purchase of the product. If, upon purchase or within the warranty period, you suspect that a rechargeable battery is obviously defective, stop using the product, disconnect it from the power supply system and contact your Sonova Consumer Hearing partner. Your Sonova Consumer Hearing partner will coordinate the repair/replacement with you.
Do not return a product with a defective battery to your dealer or Sonova Consumer Hearing partner unless requested to do so. To find a partner in your country, search at
www.sennheiser-hearing.com/service-support).
At the end of its operational lifetime, this product with its built-in rechargeable battery must be disposed of separately from normal household waste. You can find more information here: > Notes on disposal.
Firmware update
The “TVS 200 Earbuds” can be updated to the latest firmware version via the app.
Updating the firmware helps to keep the earbuds up to date. If you are experiencing functionality issues with your earbuds, first make sure that you are using the latest firmware version.
To download the app, please click on the links in the chapter Using the app(> Using the app).
The app automatically detects if a new firmware version is available for your earbuds.