Connecting the transmitter to an audio source
You can connect the transmitter either to a digital or an analog audio source (e.g. a TV and a stereo hi-fi system).
If you connect an audio source to both inputs (digital and analog), only the analog audio source will be reproduced.
|
|
You can also refer to the beginner’s video guides on how to connect your digital wireless headphone system to a TV: www.sennheiser-hearing.com/how-to-videos. |

▷Switch your audio source off before connecting the transmitter.
▷Check the connection possibilities of your audio source (audio output, usually marked “OUT”).
▷Select the corresponding connection cable and, if necessary, a suitable adapter.
▷To connect the transmitter to your audio source, refer to the connection diagram suitable for your audio source (see the following chapters). Follow the color codings on the transmitter and on the cables.
|
Connection possibilities of the audio source |
Color coding on the transmitter |
Connection cable |
Page |
||
|
|
Optical (digital) |
|
|
Optical digital cable |
|
|
|
3.5 mm jack socket (analog) |
|
|
Stereo audio cable |
|
|
|
RCA (analog) |
|
|
Stereo audio cable with RCA adapter (3.5 mm jack socket to 2 RCA connectors) |
|
|
|
SCART (analog) |
|
|
Stereo audio cable with SCART adapter (3.5 mm jack socket to SCART connector; optional accessory) |
|


|
|
If you want to connect the transmitter to a TV that has only one HDMI output, you need an active HDMI audio adapter. Using this adapter, you can connect your TV to the transmitter. An HDMI audio adapter and/or other accessories are available from your Sonova Consumer Hearing partner. |

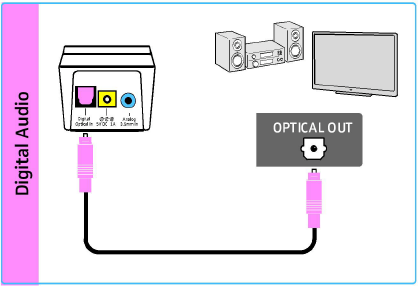
Connection possibility A: optical (digital)
To achieve the best possible listening experience, connect the transmitter to your TV or hi-fi system using the supplied optical digital cable.
Note that your wireless headphone system only supports digital signals coded in the PCM format. Information on how to set the audio format of the connected audio source to PCM can be found in the Sound menu or in the instruction manual of your device.
If an incompatible digital audio signal is being received, the Transmitter status LED flashes white and blue. Audio playback is not possible.

* The appearance of the Sound menu can vary depending on the device you are using.
▷Connect the optical digital cable to the pink Digital Optical In audio input of the transmitter and to the optical output of your audio source.

Connection possibility B: 3.5 mm jack socket (analog)
▷Connect the stereo audio cable to the blue Analog 3.5 mm In audio input (3.5 mm jack socket) of the transmitter and to the 3.5 mm headphone socket of your audio source.

|
|
Adjust the volume of the headphone socket on your TV/audio source to at least a medium level. This improves the quality of wireless audio transmission. For detailed information, please refer to the instruction manual of your TV/audio source. |
If the headphones socket on your audio source is a 6.3 mm/¼" jack socket, you require an adapter (3.5 mm jack plug to 6.3 mm/¼" jack plug, optional accessory) for the supplied 3.5 mm stereo audio cable.
|
|
Some TV models mute the loudspeakers when you connect the transmitter to the 3.5 mm headphone socket. Other TV models have their own menu for adjusting the volume of the headphone socket. Check the menu of your TV for information on how to deactivate the muting function or adjust the volume. Alternatively, connect the TV and the transmitter using a different connection possibility (A, C or D). |

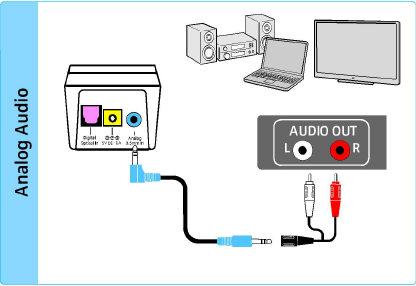
Connection possibility C: RCA sockets (analog)
▷Plug the RCA adapter onto the stereo audio cable.
▷Connect the stereo audio cable to the blue 3.5 mm jack socket of the transmitter.
▷Connect the RCA connectors to the RCA sockets (mostly labeled “AUDIO OUT” or ![]() ) of your audio source. Connect the red connector to the red RCA socket and the white connector to the white or black RCA socket.
) of your audio source. Connect the red connector to the red RCA socket and the white connector to the white or black RCA socket.

Connection possibility D: SCART socket (analog)
▷Plug the SCART adapter* onto the stereo audio cable.
▷Connect the stereo audio cable to the blue 3.5 mm jack socket of the transmitter.
▷Connect the SCART connector to the SCART socket (mostly labeled ![]() or
or ![]() ) of your audio source.
) of your audio source.
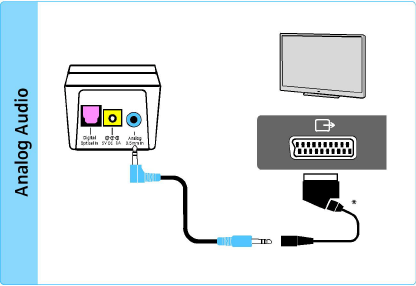
* optional accessory